How to set Microsoft Entra ID with Single-Sign-On by SAML
You can also check with Microsoft’s official Tutorial: Azure AD SSO integration with BenQ IAM as a reference.
Prerequisites
- A Microsoft Entra ID subscription.
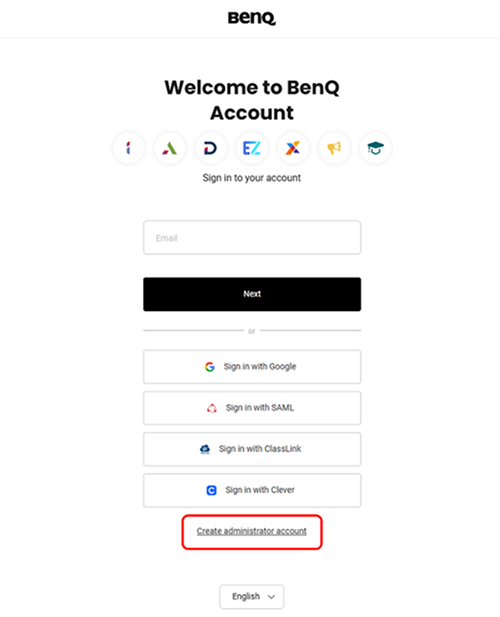
- A BenQ IAM administrator account. Please follow the normal steps to register a BenQ IAM admin account.
Add BenQ IAM as enterprise application
To configure the integration of BenQ IAM into Microsoft Entra ID, you need to add BenQ IAM from the Microsoft Entra Gallery to your list of managed SaaS apps.
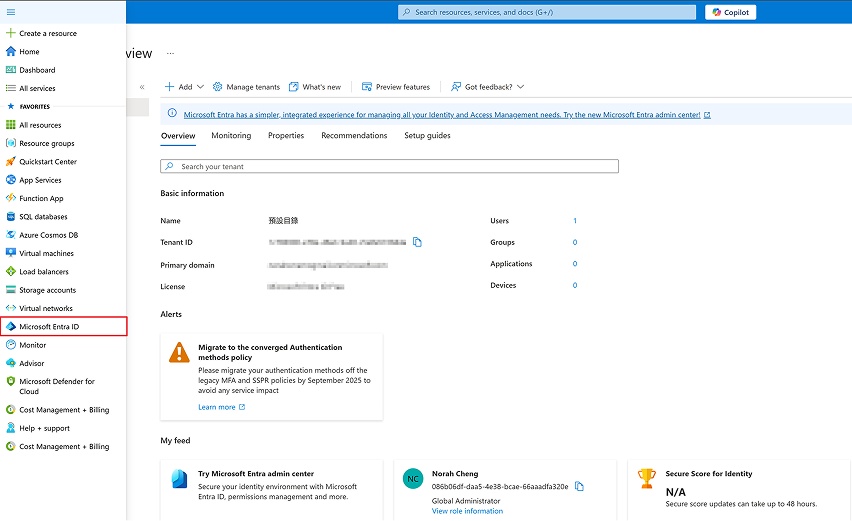
- Sign in to the Azure portal using either a work or school account, or a personal Microsoft account.
- On the left navigation pane, select the Microsoft Entra ID service.
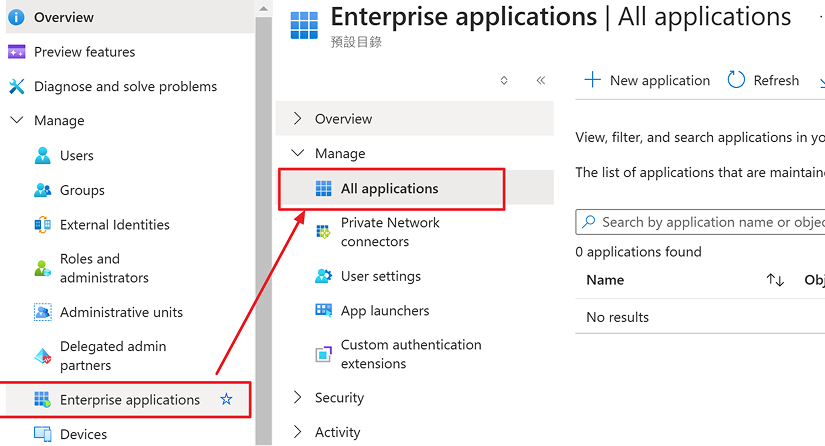
- Navigate to Enterprise Applications and then select All Applications.
- To add new application, select New application.
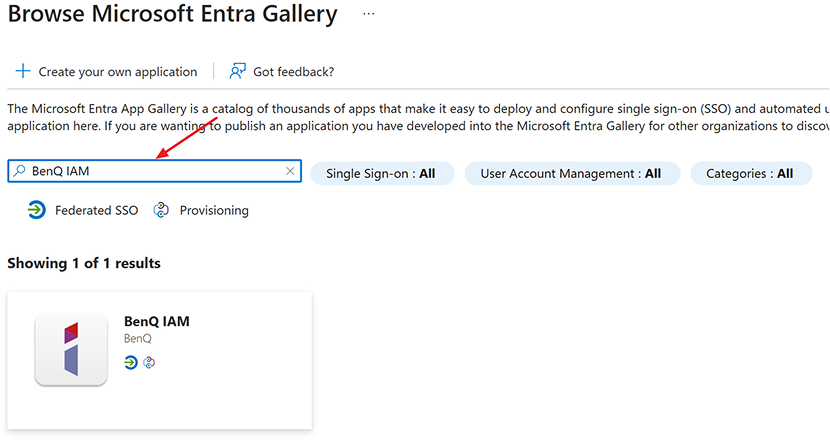
- In the Microsoft Entra Gallery section, type
BenQ IAMin the search box. - Select BenQ IAM from results panel and then add the app. Wait a few seconds while the app is added to your application list.
Configure Microsoft Entra ID SSO
Follow these steps to enable Microsoft Entra ID SSO in the Azure portal and BenQ IAM
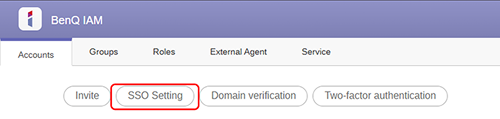
- Login BenQ IAM with BenQ Admin Account, click SSO Setting in the Account Management section.
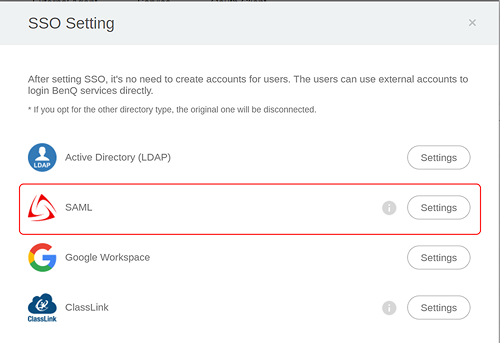
- Select SAML as SSO Setting in the pop up.
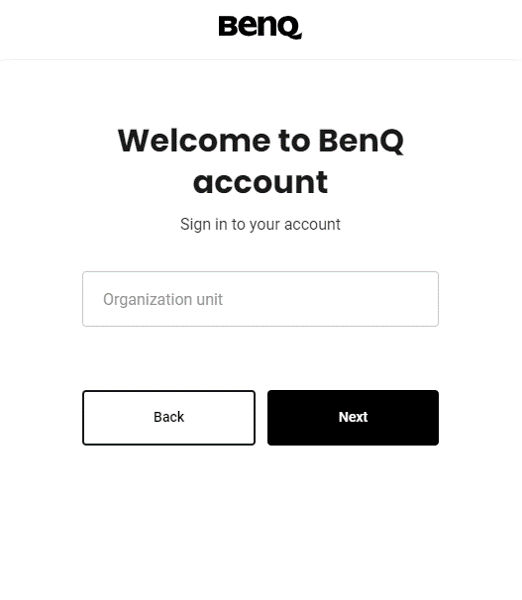
- Fill up your organization name as the “Organization Unit”.
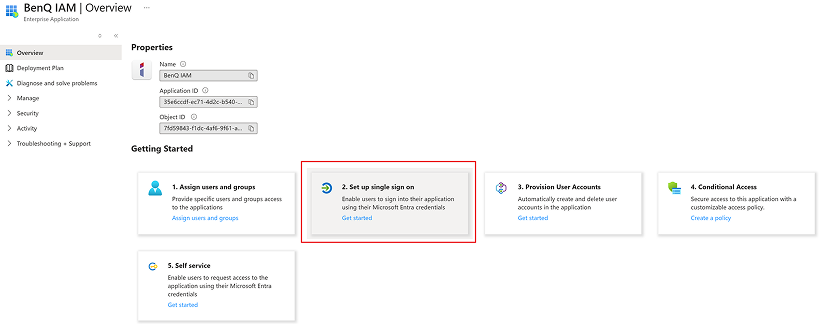
- Login the Azure portal, on the BenQ IAM application integration page click Set up single sign-on.
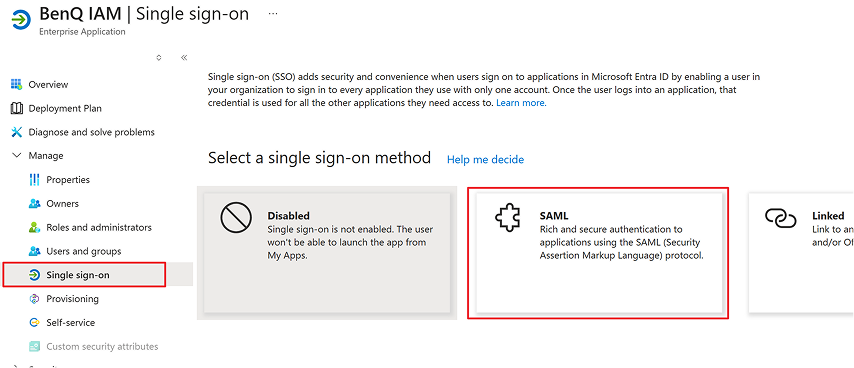
- On the Single sign-on method page, select SAML.
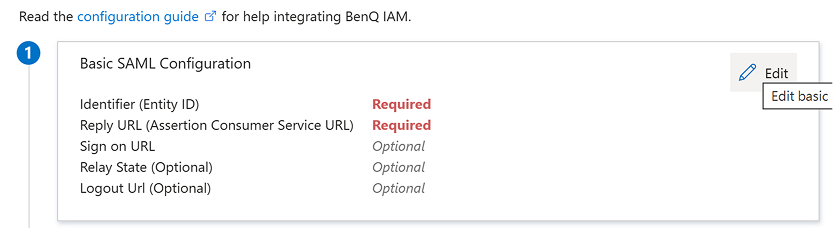
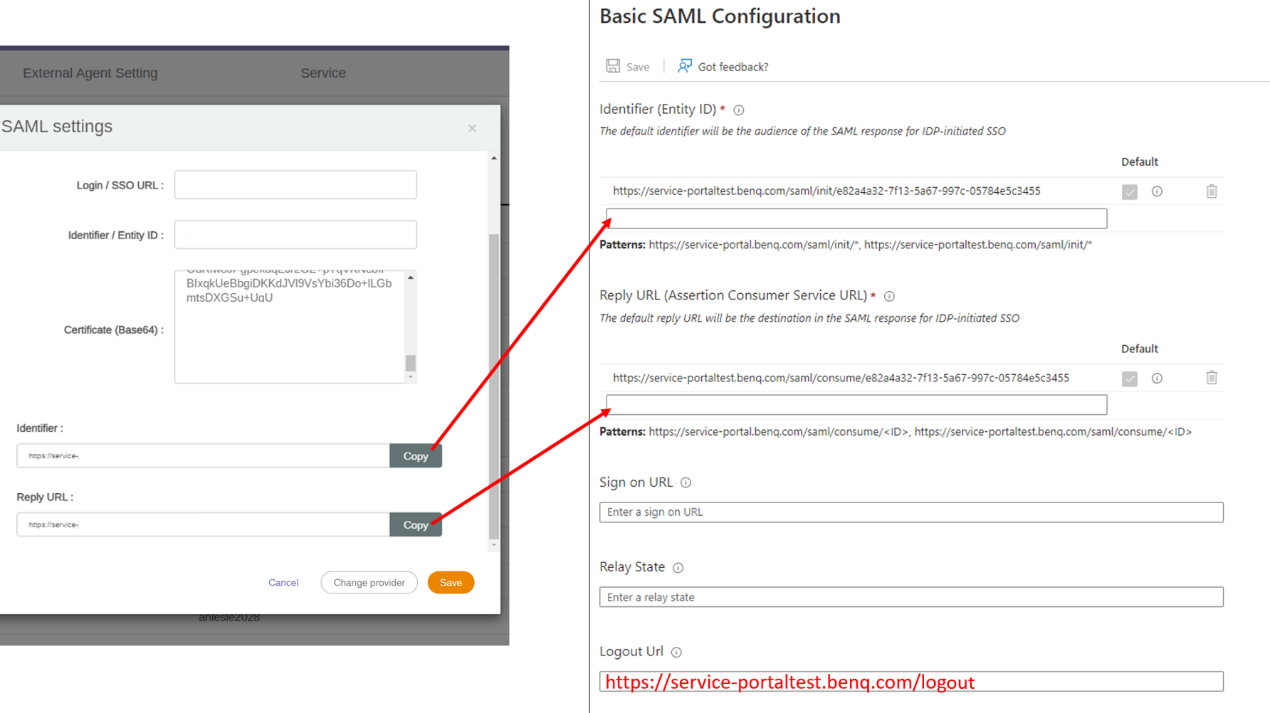
- On the Set up single sign-on with SAML page, click the pencil icon for Basic SAML Configuration to edit the settings.
- Copy text listed on IAM to fill up the required information:
- Copy the Identifier URL on BenQ IAM and paste it to the Identifier text box in Azure Portal
- Copy the Reply URL on BenQ IAM and paste it to the Reply URL text box in Azure Portal
- In the Azure Portal- Logout URL text box, type the following url:
https://service-portal.benq.com/logout - After filling the previous setting, click Save for Basic SAML Configuration.
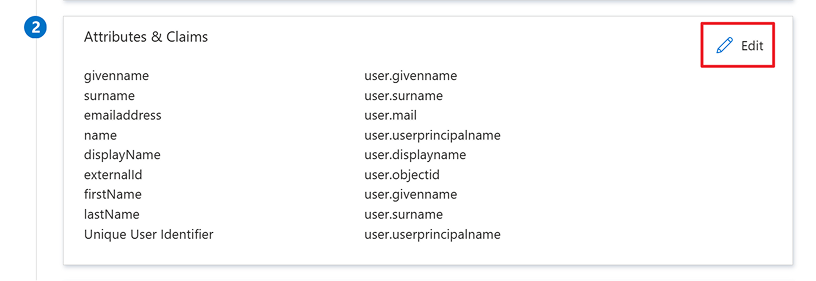
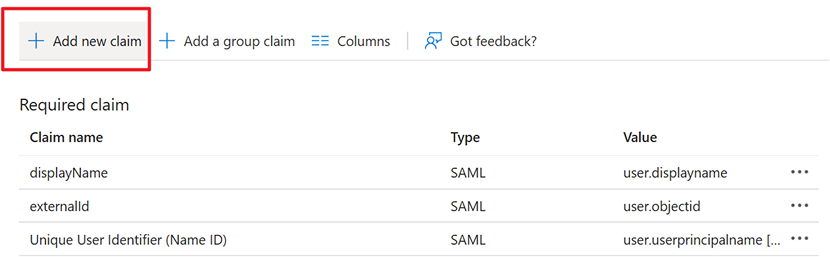
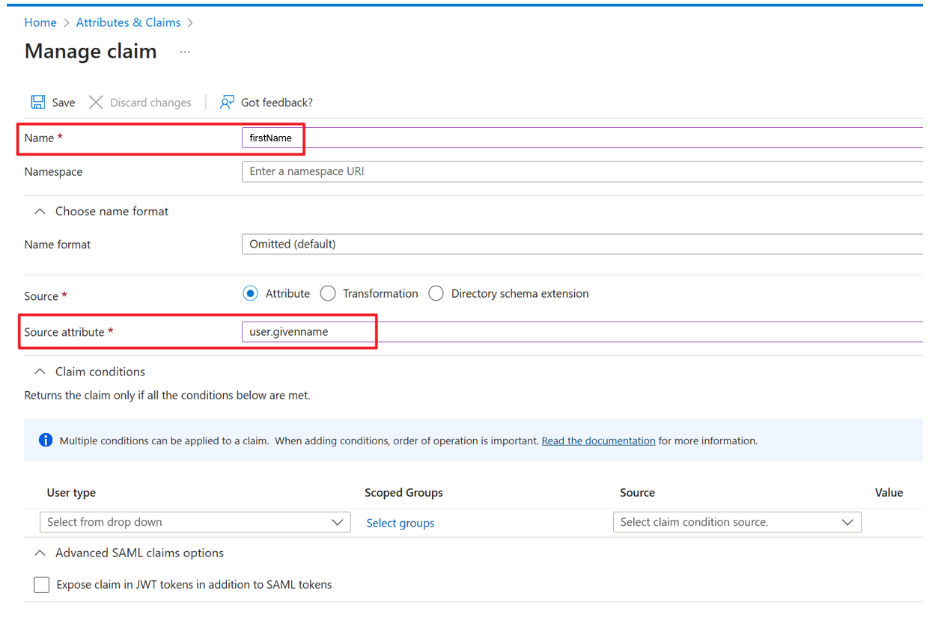
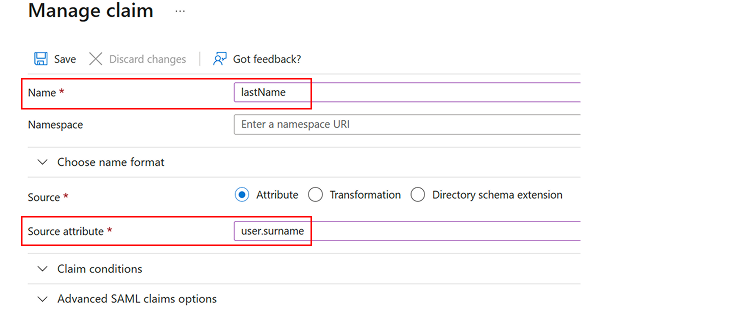
- Next, click the pencil icon for Attributes & Claims to edit attributes.
- Add new claim for
firstNameandlastName - Fill up
firstNamein Name field and define the source attribute asuser.givenname - Fill up
lastNamein Name field and define the source attribute asuser.surname - Remember click “Save” button to complete the revision.
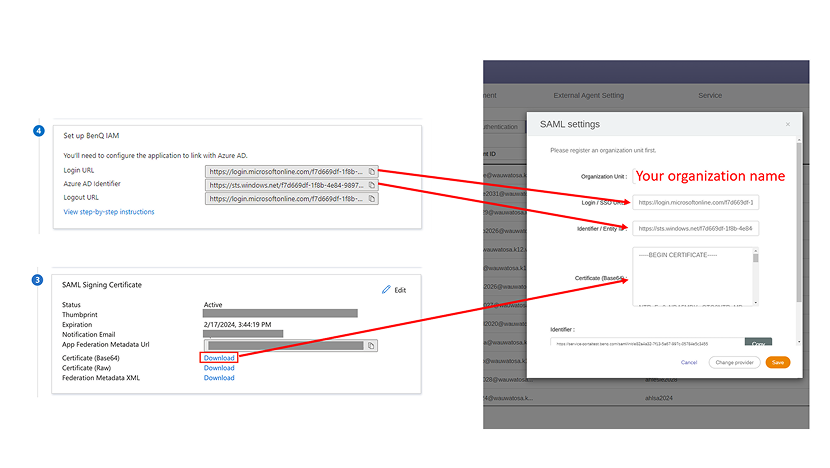
- Then you could find the Login URL, Identifier and Certificate on Azure. Please copy and paste to IAM accordingly.
- On the Set up BenQ IAM section, type the name in the Organization Unit text box that can represent your organization
- Copy the Login URL in Azure Portal and paste it to the login/SSO URL text box in BenQ IAM
- Copy the Azure AD Identifier in Azure Portal and paste it to the Identifier/Entity ID text box in BenQ IAM
- On the Set up single sign-on with SAML page of Azure Portal, in the SAML Signing Certificate section, find Certificate (Base64) and select Download to download the certificate and save it on your computer. Open the Certificate (Base64), copy and paste it to the Certificate (Base64) text box in BenQ IAM
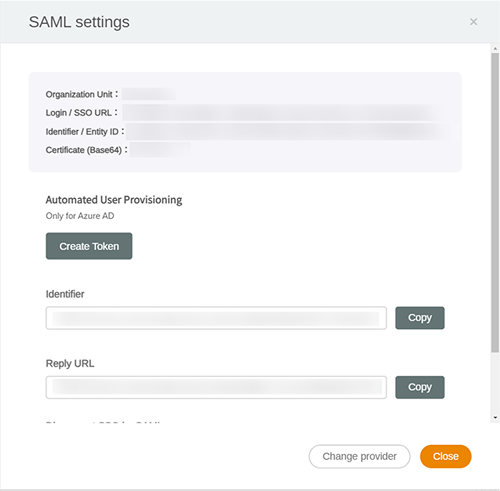
- After filling the previous setting, remember to select Available service settings by preference and click Save.
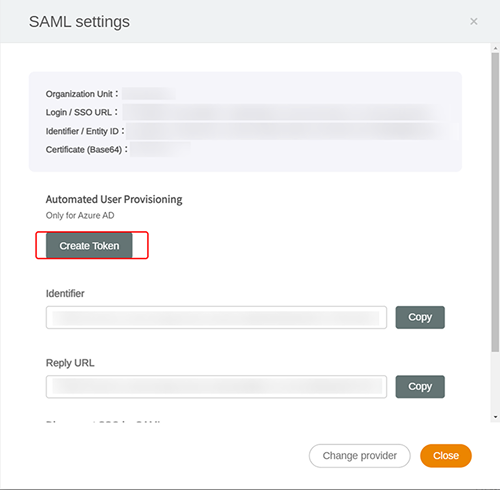
- BenQ IAM will show the success message as below image. Then, you can go further to configure BenQ IAM for automatic user provisioning.
Continue to check how to configure BenQ IAM for automatic user provisioning
Configure BenQ IAM for automatic user provisioning
You can also check with Microsoft’s official Tutorial: Configure BenQ IAM for automatic user provisioning
Following the results in How to set Microsoft Entra ID with Single-Sign-On chapter. In the success message windows of BenQ IAM, please, click Create Token.
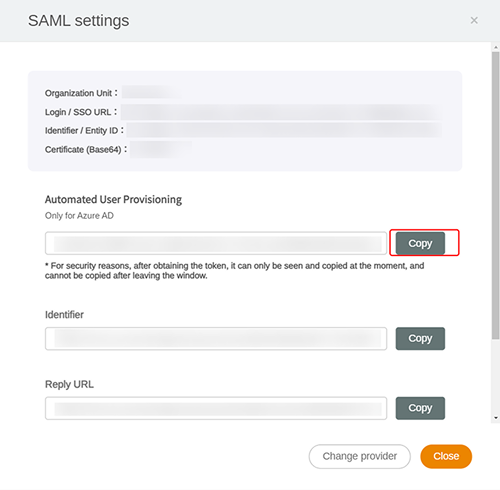
Copy the token. Please keep this token carefully, it will be used in the Azure portal later.
Back to Azure portal, on the BenQ IAM application integration page, find the Manage section and select Provisioning.
Set the Provisioning Mode to Automatic.

Under the Admin Credentials section. About the tenant URL Please enter the url -
https://service-portal.benq.com/api/scim/v2About the secret token, fill in the token that generated in Step1.
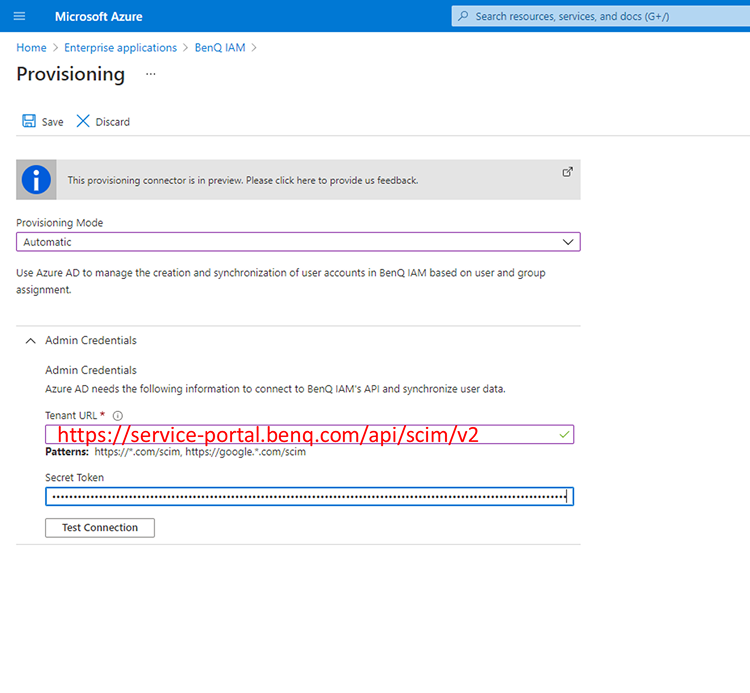
In the Notification Email field, enter the email address of a person or group who should receive the provisioning error notifications and select the Send an email notification when a failure occurs check box.
Select Save.
Mapping the attribute for provision
To ensure the data of Microsoft Entra ID display correctly in IAM, please mapping the attribute according to the steps below:
You will need to recreate the client secret and ask the customer to verify that their attribute mapping is correct before proceeding.
- Enable the capability to edit the list of supported attributes by navigating to the following URL:
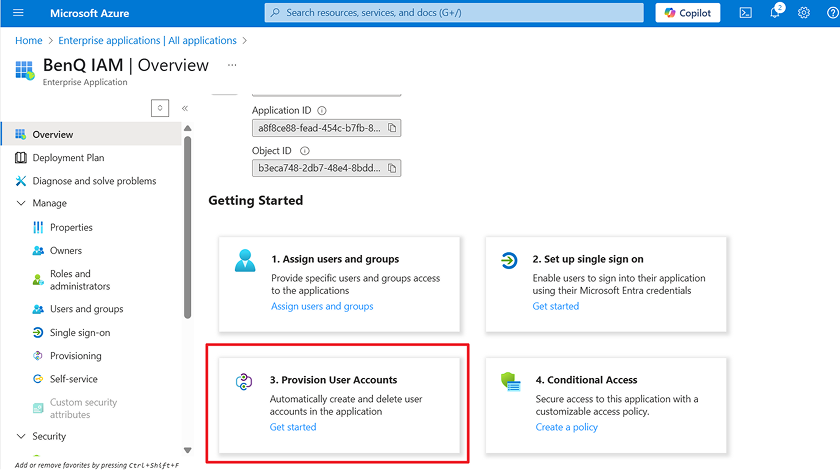
https://portal.azure.com/?Microsoft_AAD_Connect_Provisioning_forceSchemaEditorEnabled=true - Go to BenQ IAM application overview and click “Provision User Accounts”
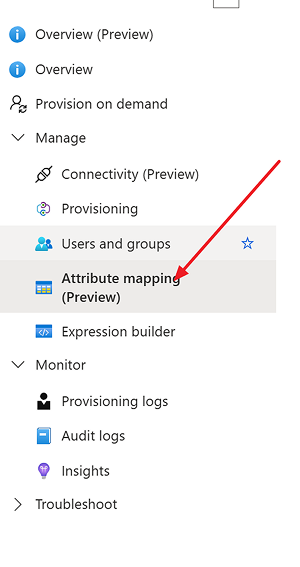
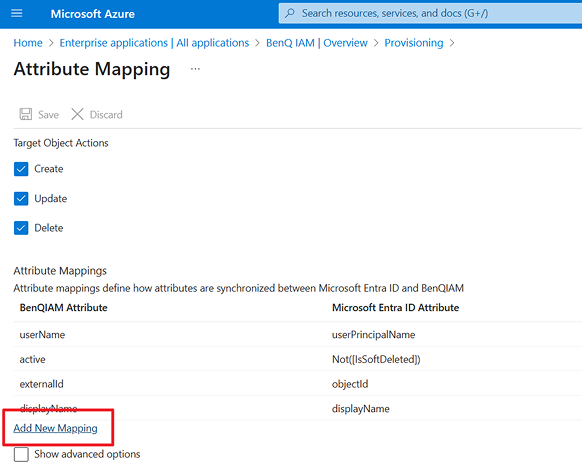
- Click “Attribute mapping”
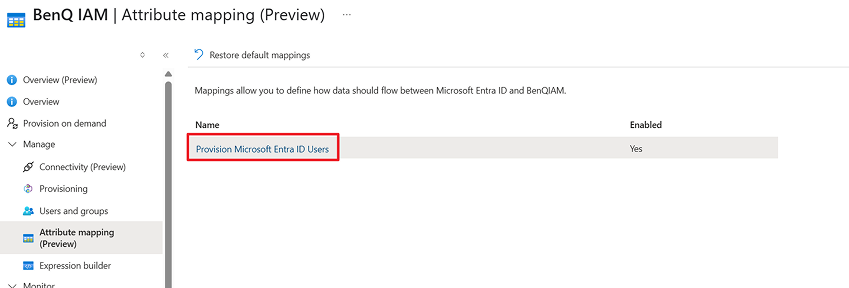
- Click “Provision Microsoft Entra ID Users” under the “Mappings” section
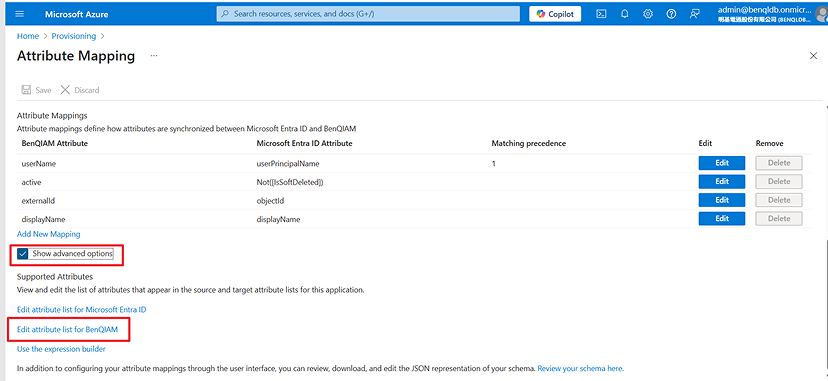
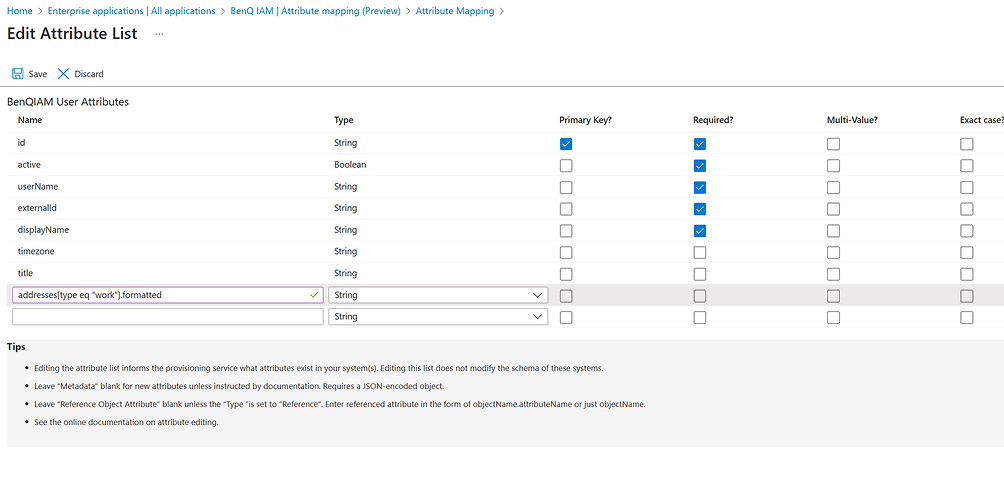
- Add
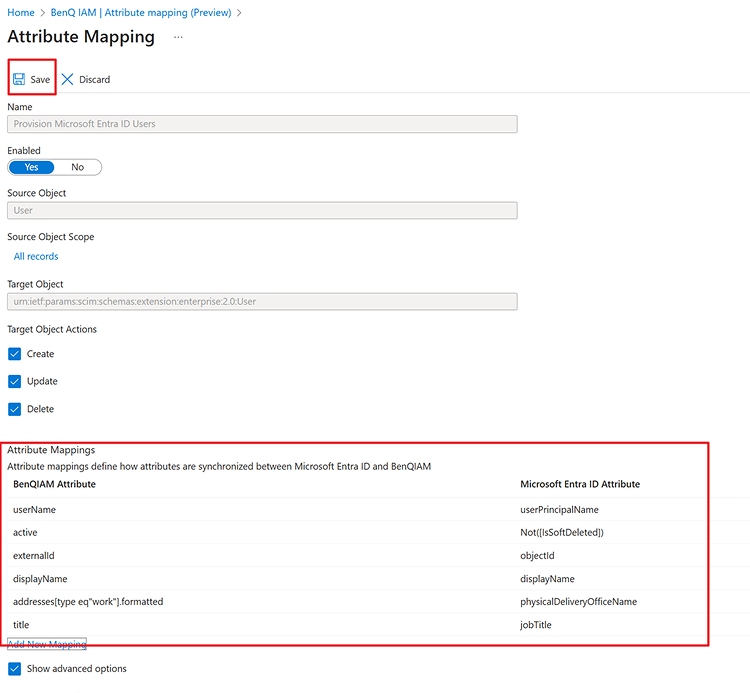
name.givenName,name.familyName,title,addresses[type eq "work"].formattedcolumn and set as String type. Click check box to set as Required columns and Save. - You will be navigated to the Attribute Mapping page after saving the revision. Now you can click “Add New Mapping”
- Now you can associate Source attribute and Target attribute.
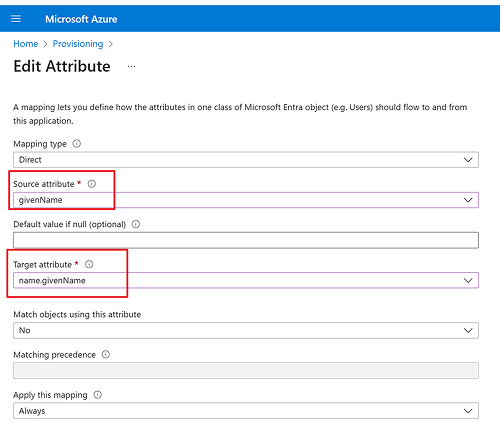
1. Select source attribute asgivenName, andname.givenNameas target attribute.
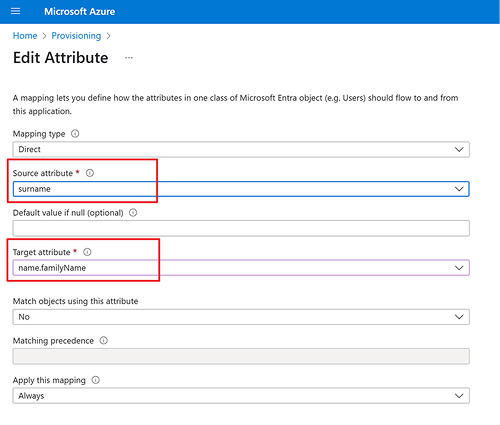
2. Select source attribute assurname, andname.familyNameas target attribute.
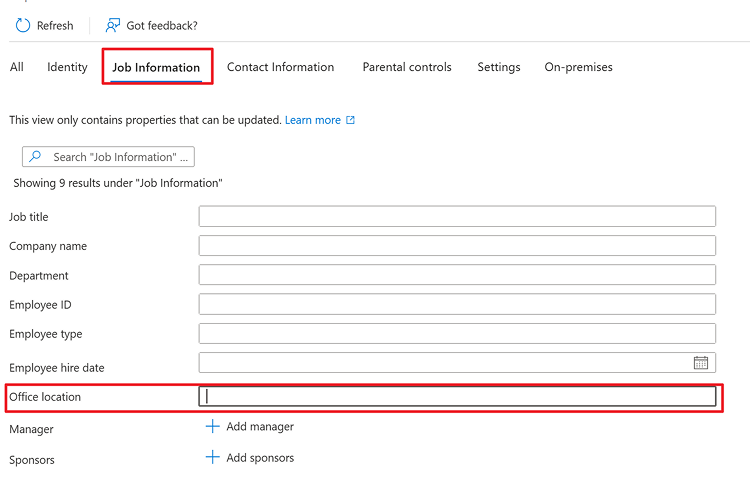
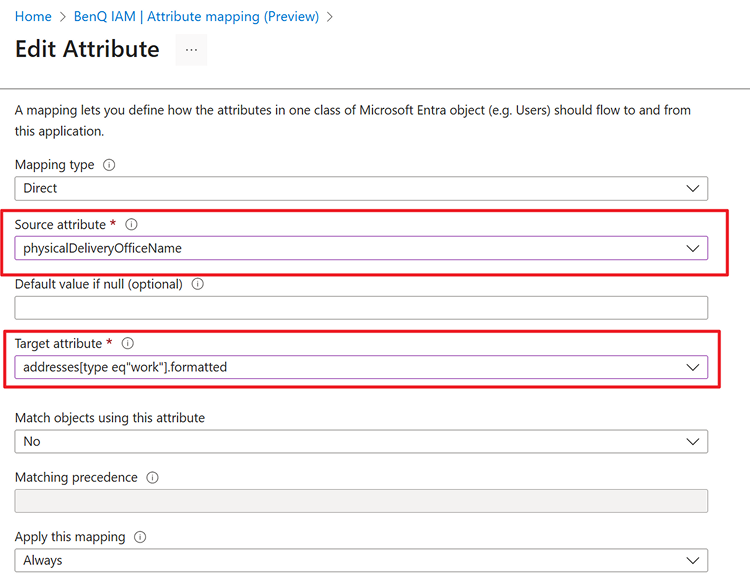
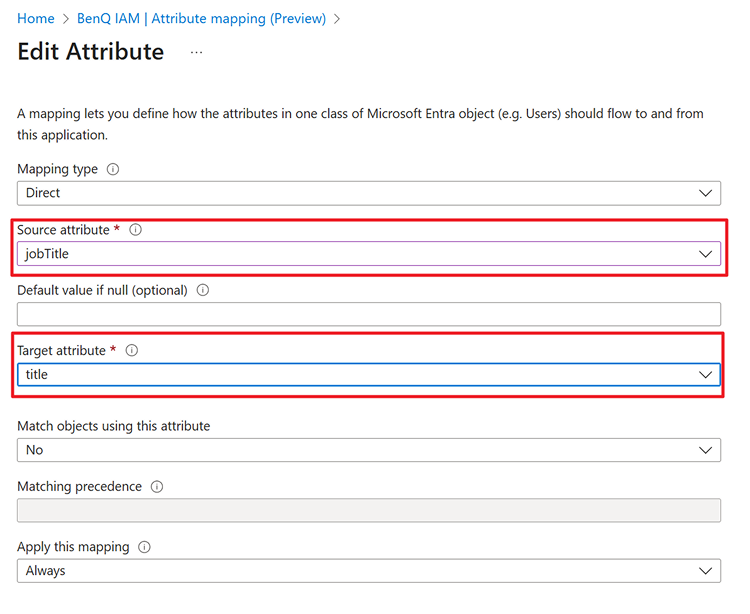
3. Select source attribute asjobtitle, andtitleas target attribute.
4. Select source attribute asphysicalDeliveryOfficeName, andaddresses[type eq "work"].formattedas target attribute. This attribute corresponds to User property > Job information > Office location - Check the attribute mapping table again and click ”Save” to complete the mappings.
Prerequisites
- A Google Workspace subscription.
- A BenQ IAM administrator account. Please follow the normal steps to register a BenQ IAM admin account.
Configure Google Workspace SSO
Follow these steps to enable Google Workspace SSO in Google Workspace and BenQ IAM.
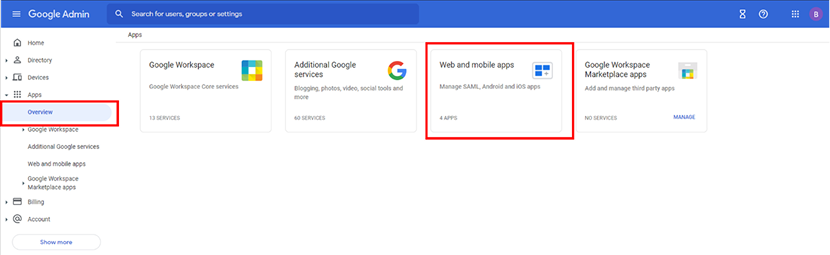
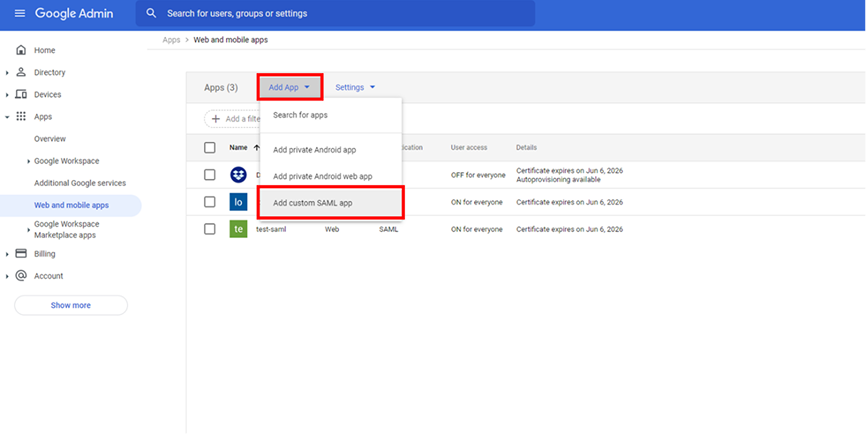
- Visit Google Workspace > Google Admin (https://admin.google.com/).
- Under Apps > Overview > select Web and mobile apps section
- Select Add App > Add custom SAML app
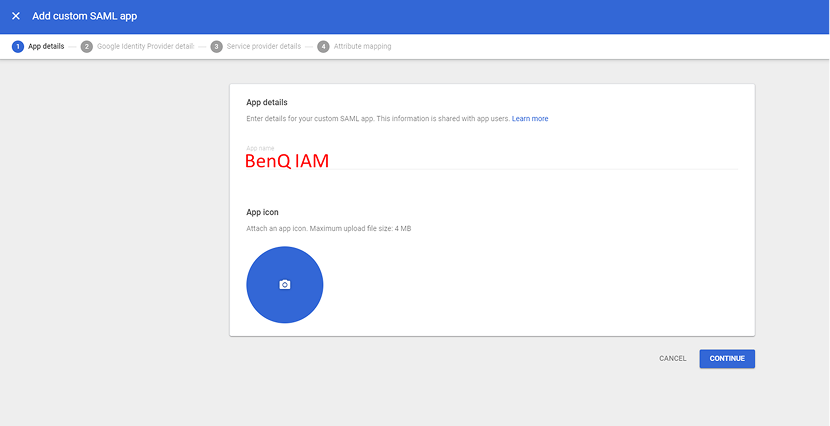
- Type
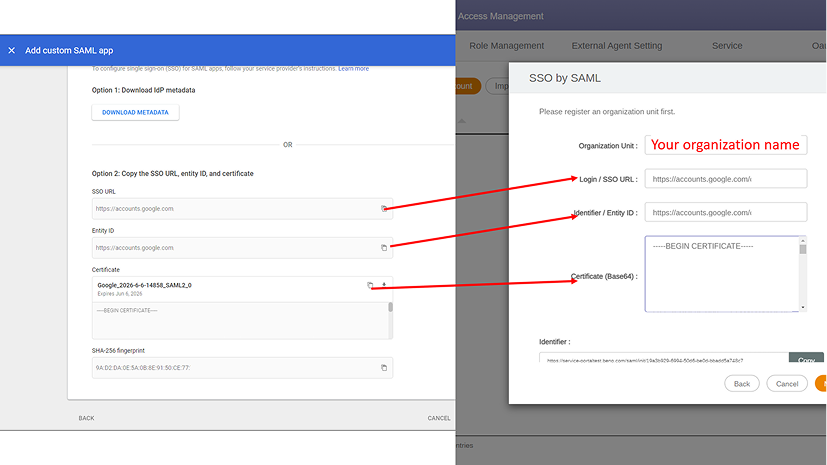
BenQ IAMin the App name text box, then click CONTINUE - On the Google Identity Provider details section, we choose Option 2 to do SSO integration by performing the following steps
- Login BenQ IAM with BenQ Admin Account, click SSO Setting in the Account Management section.
- Select SSO by SAML as SSO Setting in the pop up.
- On the Set up BenQ IAM section, type the name in the Organization Unit text box that can represent your organization
- Copy the SSO URL in Google Workspace and paste it to the login/SSO URL text box in BenQ IAM
- Copy the Entity ID in Google Workspace and paste it to the Identifier/Entity ID text box in BenQ IAM
- Copy the Certificate in Google Workspace and paste it to the Certificate (Base64) text box in BenQ IAM
- Click Continue in Google Workspace
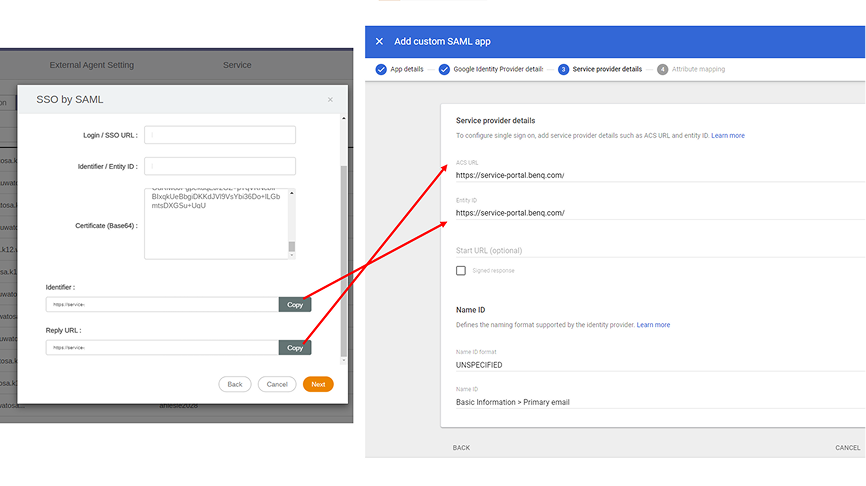
- On the Service provider details section
- Copy the Identifier URL in BenQ IAM and paste it to the Entity ID box in Google Workspace.
- Copy the Reply URL in BenQ IAM and paste it to the ACS URL box in Google Workspace.
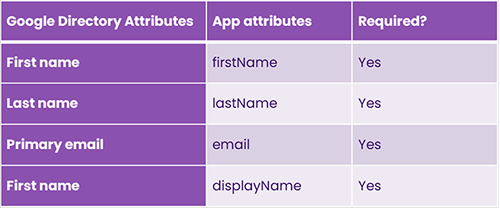
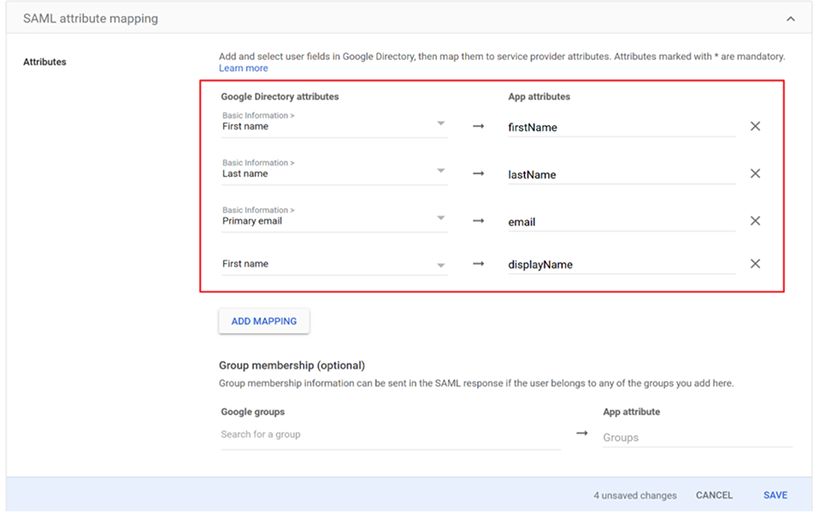
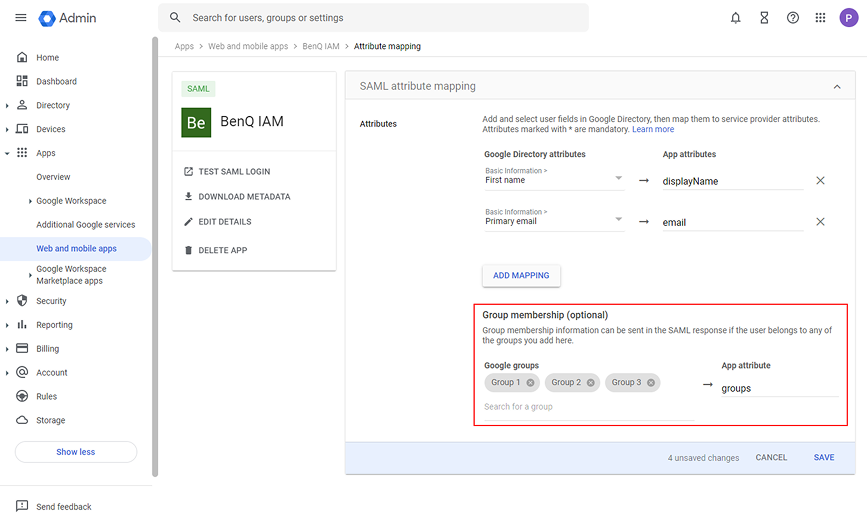
- On the Attribute mapping section, there are some attributes need to be mapped.
- Choose Google Directory Attributes and map it with App attributes as bellow table
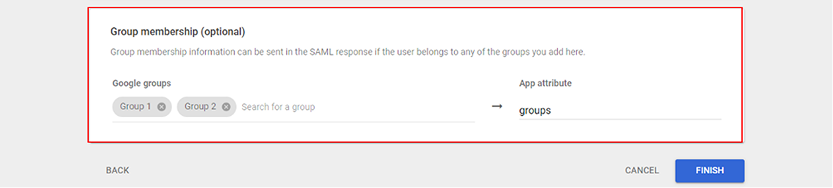
- If mapping the group attributes to BenQ IAM is needed, please choose the Google groups you need to propagate to BenQ IAM and map it with groups. (Optional)
- Then, click FINISH.
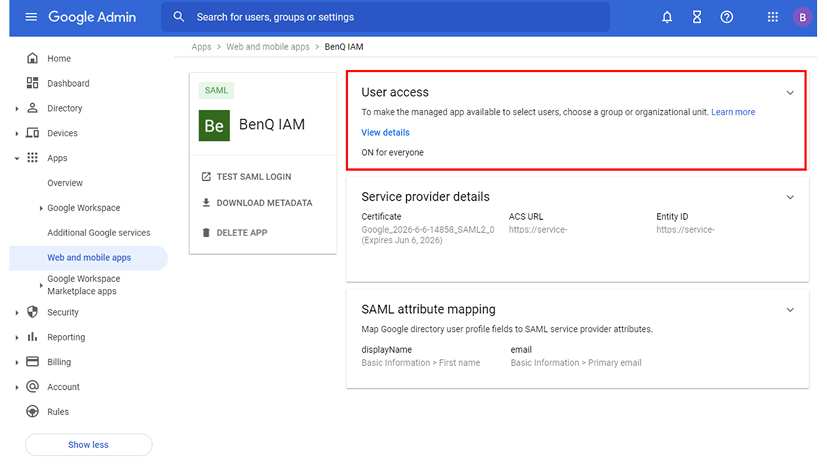
- Now, the SSO integration with Google Workspace has been set successfully. Please make sure the users under your directory have permission to login BenQ IAM by checking User access section in Google Workspace. You can permit access permissions by organizational units, groups or individuals. Then, it can make sure that only the authorized users can login to BenQ boards and services.
- If the new groups needs to be propagated to BenQ IAM, please go to SAML attribute mapping section and add the Google groups in Google membership.
For the latest information of Okta SAML settings, please refer to Okta website: https://support.okta.com/help/s/?language=en_US
Prerequisites
- An Okta subscription.
- A BenQ IAM administrator account. Please follow the normal steps to register a BenQ IAM admin account.
Configure BenQ IAM as a SAML Application
To configure the integration of BenQ IAM into Okta, you need to create an SAML v2.0 app integration in Okta admin console.
- Login BenQ IAM with BenQ Admin Account, click SSO Setting in the Account Management section
- Select SAML as SSO Setting in the pop up
- Fill up your organization name as the Organization Unit.
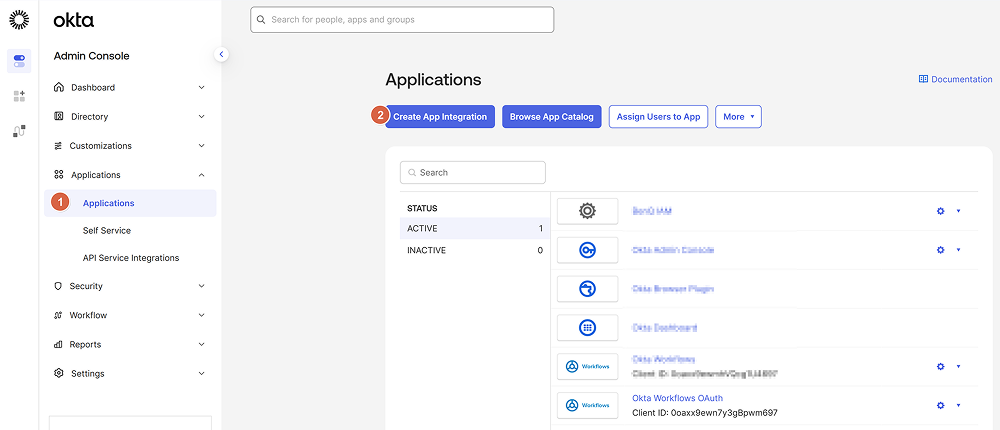
- Sign in to the Okta Admin Console.
- On the left navigation pane, select the Applications.
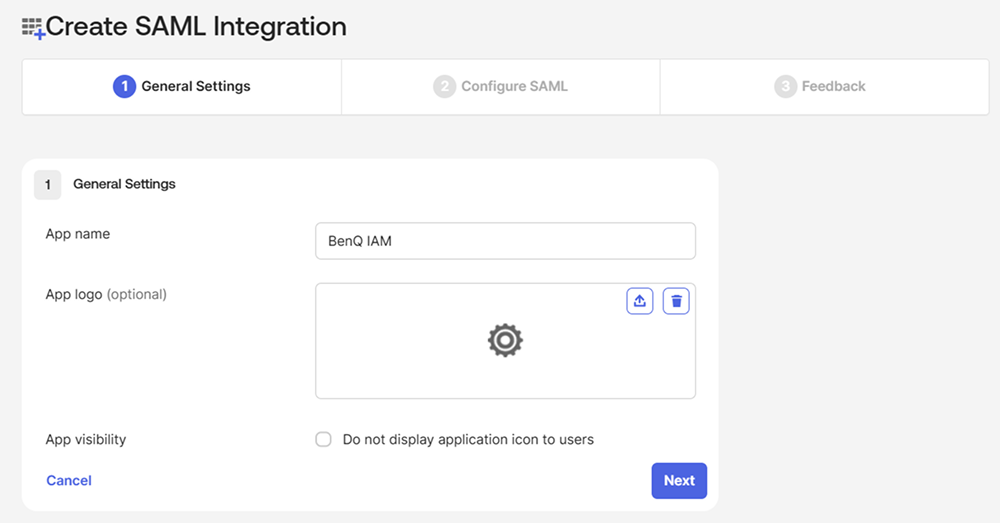
- Click on Create App Integration. And choose SAML 2.0 as Sign-in method.
- Fill up the App name, for example BenQ IAM.
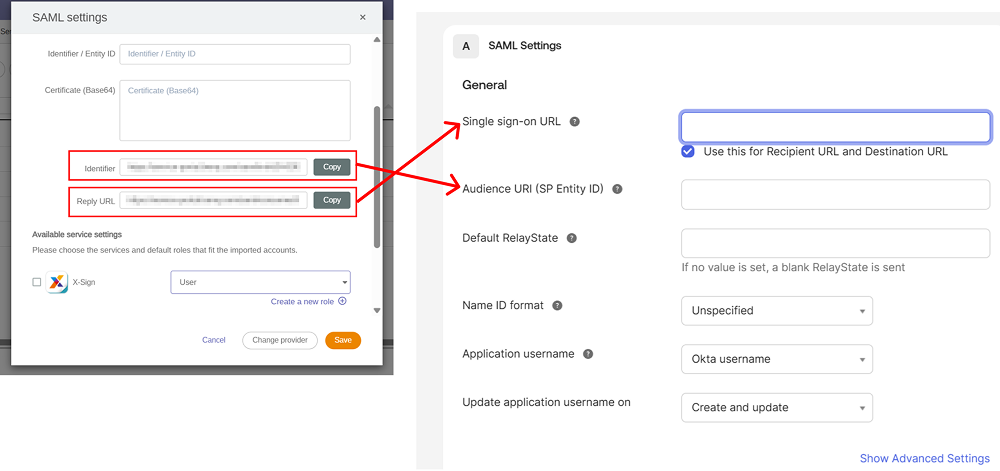
- Copy text listed on IAM to fill up the required information:
- Copy the Identifier URL on BenQ IAM and paste it to the Audience URI (SP Entity ID) text box in Okta Portal
- Copy the Reply URL on BenQ IAM and paste it to the Single sign-on URL text box in Azure Portal
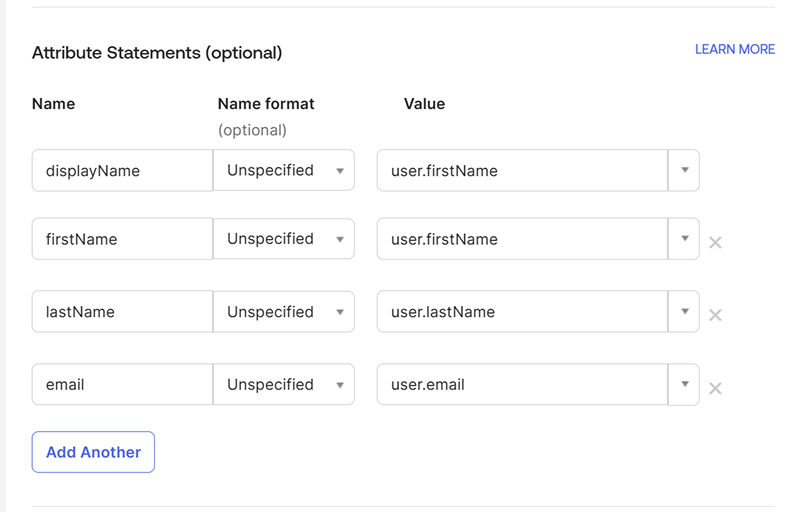
- On the Attribute Statements, map the attribute as following then finish the settings.
- Then you can find the Sign on URL, Issuer and Signing Certificate. Please copy and paste to IAM accordingly.
- On the Set up BenQ IAM section, type the name in the Organization Unit text box that can represent your organization
- Copy the Sign on URL and paste it to the login/SSO URL text box in BenQ IAM
- Copy the Issuer and paste it to the Identifier/Entity ID text box in BenQ IAM
- Copy the Signing Certificate and paste it to the Identifier/Entity ID text box in BenQ IAM
- After filling the previous setting, remember to select Available service settings by preference and click Save.
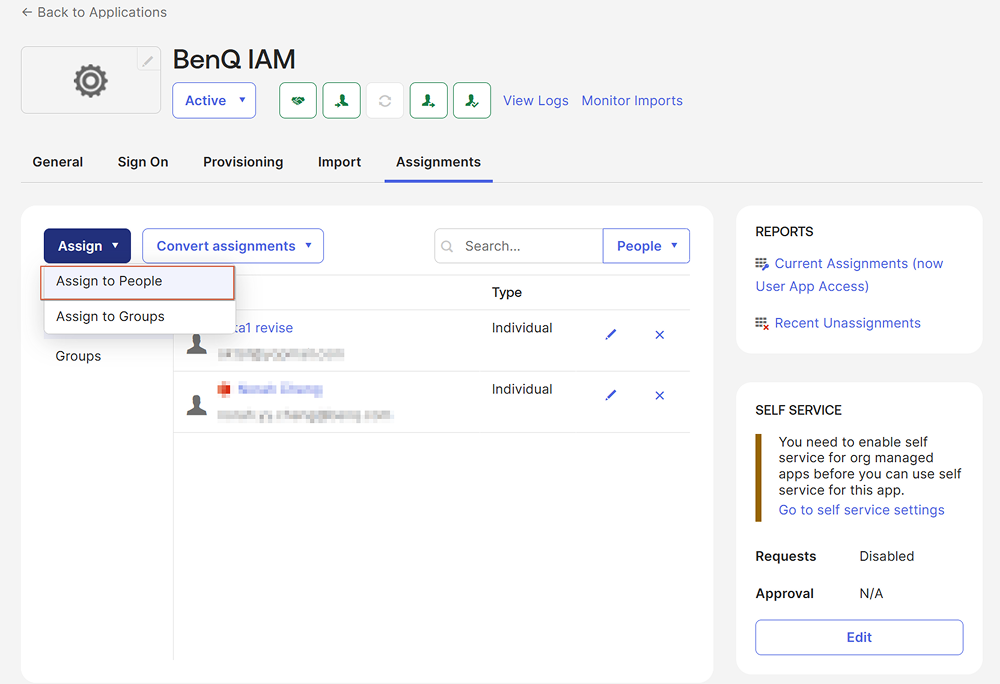
- After setup, remember to assign the application to the users you wish to sync with BenQ IAM. Navigate to Assignments > Assign > Assign to People/Group and select the desired members.


Prerequisites
- A Microsoft Entra ID subscription.
- A BenQ IAM administrator account. Please follow the normal steps to register a BenQ IAM admin account.

Configure Microsoft Entra (OAuth) SSO
Follow these steps to enable Microsoft Entra (OAuth) SSO in BenQ.
- Login BenQ IAM with BenQ admin account, click SSO Setting in the Account Management section.
- Select Microsoft Entra (OAuth) in the pop up.
- Enable service and configure permission for members.
- Login or choose you Microsoft365 administrator account.
- Click Accept to grant the access.
- Click Set up under Synchronization settings. Choose whether to import, update, or delete accounts.
- Click Set up under Import account settings. This setting lets you sync the domain you prefer and import all accounts or specific groups from Microsoft Entra ID. By default, BenQ IAM will import all accounts from the primary domain. If you are satisfied with the default settings, you can skip to step 8.
- If you select Import by group, please fill in and add the group name you want according to Microsoft Azure Portal.
- Click Apply.
- Enable Automatic synchronization to activate user auto-provisioning from your Microsoft Entra ID.
- Click Sync now to finish the settings.


Prerequisites
- A Google Workspace subscription.
- A BenQ IAM administrator account. Please follow the normal steps to register a BenQ IAM admin account.

Configure Google Workspace SSO
Follow these steps to enable Google Workspace SSO in BenQ.
- Login BenQ IAM with BenQ admin account, click SSO Setting in the Account Management section.
- Select Google Workspace Settings in the pop up.
- Login or choose you Google Workspace administrator account.
- Click Allow to grant the access.
- Click Set up under Import account settings. This setting lets you sync the domain you prefer and import all accounts or specific groups from Google Workspace. By default, BenQ IAM will import all accounts from the primary domain. If you are satisfied with the default settings, you can skip to step 9.
- You can choose the domain you want and select either Import all accounts or Import by group.
- If you select Import by group, please fill in and add the group email you want according to Google Admin Console.
- Click Apply.
- Enable Automatic synchronization to activate user auto-provisioning from your Google Workspace directory.
- Click Sync now to finish the settings.


Prerequisites
- A ClassLink subscription.
- A BenQ IAM administrator account. Please follow the normal steps to register a BenQ IAM admin account.

Configure ClassLink SSO
Follow these steps to enable ClassLink SSO in ClassLink and BenQ.
- Login BenQ IAM with BenQ admin account, click SSO Setting in the Account Management section.
- Select SSO by ClassLink as SSO Setting in the pop up.
- Please configure default user role for imported accounts
- Then, click Next to enter ClassLink login page.
- Login your ClassLink account.
- If you’d like to import users from OneRoster, please follow the next chapter. If not, please click save to complete settings.


- Go to https://launchpad.classlink.com/ , login with administrator account.
In Roster Server management console > Add New App, search for BenQ IAM and add it. - Let us find the information we need here to complete the setup in BenQ SSO.
These are Client ID and Client Secret .
Under Applications > BenQ IAM > API, you can find Key(Client ID) and Secret(Client Secret) . - In SSO setting for ClassLink , user can enable One Roster connection as below.
Fill in Client ID and Client Secret to complete the OneRoster configuration. - BenQ IAM will show message as below, click Sync now to start syncing users.
- Once you see below dialog, the sync task is now queued and will run in background, you can close below dialog by click X button in the top right corner, and continue other management tasks.
- Revisit this dialog later by go to SSO setting > ClassLink as below:
- Sync status will be displayed as below:


Prerequisites
- A Clever subscription, user account and password.
- District ID / School Name or School ID for your organization.

Configure Clever SSO
Follow these steps to enable Clever SSO in BenQ.
- Login BenQ IAM with BenQ admin account, click SSO Setting in the Account Management section.
- Select Clever as SSO Setting in the pop up.
- Please fill in your Clever District ID , set the default BenQ service role, then, click Save.
- BenQ IAM will display the success toast message with a confirmation dialog as below:


